
VBA UserForm Tutorial – Step-by-Step Guide for Beginners
Build your first VBA UserForm from scratch: controls, layout, validation, dropdown lists, and writing data back to worksheets—with complete, ready-to-use code.
Spreadsheets are great for storing data, but they make poor input forms. Users type values into the wrong column, skip required fields, or misspell dropdown values. UserForms solve exactly these problems. You design a custom dialog with text fields, dropdown lists, checkboxes, and buttons—and control precisely what data gets written to the worksheet and how.
This guide takes you from a blank form to a fully functional input mask. Every code example is complete and ready to paste.
Want a shortcut? The VBA Code Generator builds complete UserForms from a text description—layout, event handlers, and data transfer included.
What Is a UserForm?
A UserForm is a custom dialog window inside Excel. Compared to the basic InputBox, a UserForm offers:
- Multiple input fields at once—instead of one prompt per InputBox call
- Dropdown lists and checkboxes—for controlled, error-free input
- Input validation—check required fields before saving
- Professional appearance—labels, groupings, and logical layout
When to use a UserForm instead of InputBox:
| Criterion | InputBox | UserForm |
|---|---|---|
| Single value | ✅ Ideal | Overkill |
| 3+ input fields | Awkward | ✅ Clean layout |
| Dropdown selection | Not possible | ✅ ComboBox/ListBox |
| Input validation | Type check only | ✅ Fully customizable |
| Reusable | No | ✅ Yes |
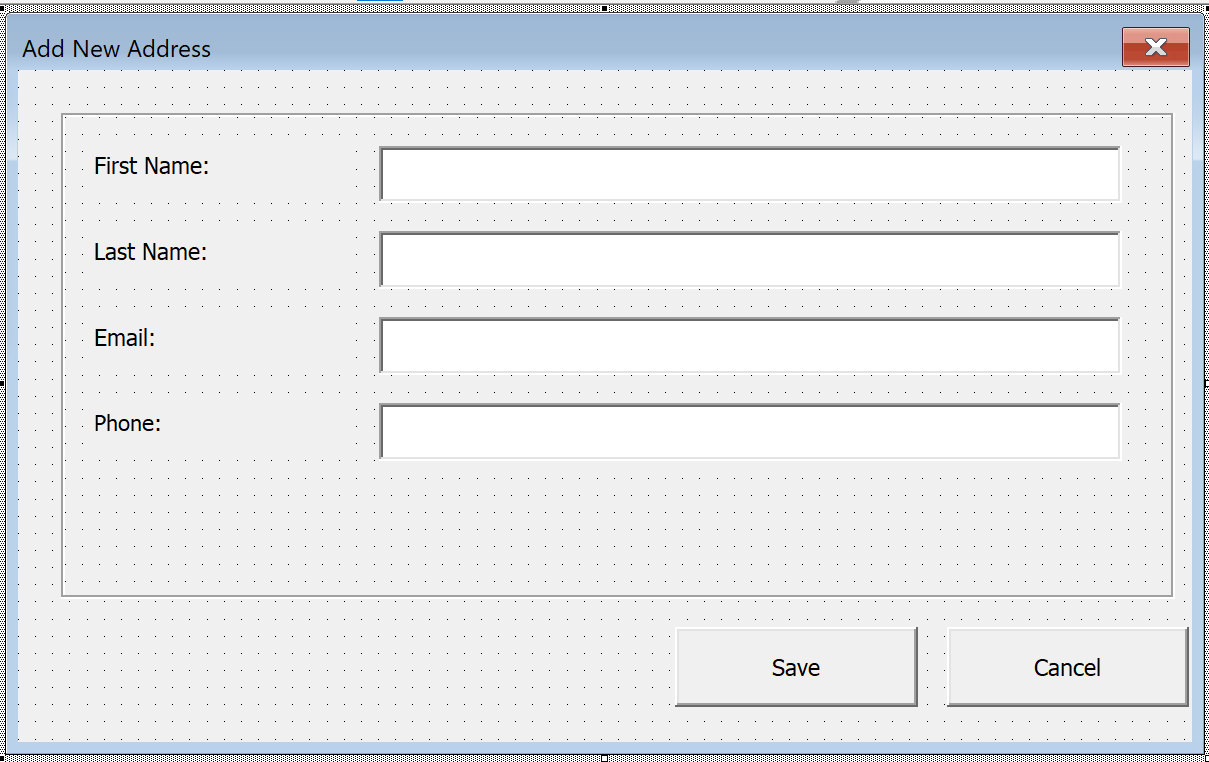
A typical UserForm looks like this: labels on the left, text boxes on the right, a dropdown below for predefined selections, and two buttons at the bottom—"Save" and "Cancel."
Creating a UserForm – First Steps
1. Open the VBA Editor (Alt + F11)
Press Alt + F11 to open the Visual Basic Editor. On the left, you will see the Project Explorer listing your workbooks and modules.
2. Insert a UserForm (Insert → UserForm)
Click Insert → UserForm in the menu. A blank gray canvas appears—your future input form. The Project Explorer now shows a new object (by default UserForm1).
Tip: Rename the UserForm immediately. Right-click the form → Properties → change (Name) to something like frmAddress. The frm prefix is the standard naming convention for forms.
3. Getting to Know the Toolbox
When the UserForm is active, the Toolbox appears automatically. If it doesn't: View → Toolbox.
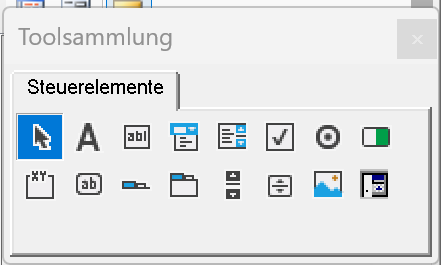
Here are the controls you will use most:
| Control | Prefix | Purpose |
|---|---|---|
| Label | lbl | Static text, not editable |
| TextBox | txt | Text input from the user |
| CommandButton | btn or cmd | Buttons that trigger actions |
| ComboBox | cbo | Dropdown list (single selection) |
| CheckBox | chk | Yes/No toggle |
| ListBox | lst | List with single or multi-select |
| OptionButton | opt | Exclusive choice (radio button) |
| Frame | fra | Groups related controls |
Drag a control from the Toolbox onto the UserForm, then adjust its position and size. Use the Properties window (F4) to set the name, caption, font size, and other options.
Practical Example: Address List Input Form
Let's build a complete input form with four fields, validation, and data transfer to a worksheet.
1. Design the Layout
Create a new UserForm (frmAddress) and place the following controls:
- 4 Labels:
lblFirstName,lblLastName,lblEmail,lblPhone - 4 TextBoxes:
txtFirstName,txtLastName,txtEmail,txtPhone - 2 Buttons:
btnSave(Caption: "Save"),btnCancel(Caption: "Cancel")
Set the label captions to "First Name:", "Last Name:", "Email:", and "Phone:". Arrange labels on the left and text boxes to their right. Place the buttons below the input fields.
For the UserForm itself, set:
Caption= "Add New Address"StartUpPosition= 1 (center of screen)
The finished form looks like this:
2. Transfer Data to the Worksheet
The following code belongs in the UserForm's code module (double-click the form or the button). It validates input, finds the next empty row in the "Addresses" worksheet, and writes the data:
Option Explicit

Private Sub btnSave_Click()
    ' --- Validation ---
    If Len(Trim(txtFirstName.Value)) = 0 Then
        MsgBox "Please enter a first name.", vbExclamation, "Required Field"
        txtFirstName.SetFocus
        Exit Sub
    End If
    If Len(Trim(txtLastName.Value)) = 0 Then
        MsgBox "Please enter a last name.", vbExclamation, "Required Field"
        txtLastName.SetFocus
        Exit Sub
    End If
    If InStr(txtEmail.Value, "@") = 0 Or InStr(txtEmail.Value, ".") = 0 Then
        MsgBox "Please enter a valid email address.", vbExclamation, "Validation"
        txtEmail.SetFocus
        Exit Sub
    End If

    ' --- Find next empty row ---
    Dim ws As Worksheet
    Set ws = ThisWorkbook.Worksheets("Addresses")
    Dim nextRow As Long
    nextRow = ws.Cells(ws.Rows.Count, "A").End(xlUp).Row + 1

    ' --- Write data ---
    ws.Cells(nextRow, 1).Value = Trim(txtFirstName.Value)
    ws.Cells(nextRow, 2).Value = Trim(txtLastName.Value)
    ws.Cells(nextRow, 3).Value = Trim(txtEmail.Value)
    ws.Cells(nextRow, 4).Value = Trim(txtPhone.Value)
    ws.Cells(nextRow, 5).Value = Now  ' Timestamp

    ' --- Clear form for next entry ---
    txtFirstName.Value = ""
    txtLastName.Value = ""
    txtEmail.Value = ""
    txtPhone.Value = ""
    txtFirstName.SetFocus

    MsgBox "Address saved (row " & nextRow & ").", vbInformation
End Sub

Private Sub btnCancel_Click()
    Unload Me
End Sub
What happens step by step:
- Validation checks that first name and last name are filled in, and that the email contains an
@sign and a period. ws.Cells(ws.Rows.Count, "A").End(xlUp).Row + 1jumps to the last used row in column A and adds 1—that's the next free row.- Values are cleaned with
Trim(removing leading and trailing spaces) and written to columns A through E. - After saving, all fields are cleared and focus returns to the first field—ready for the next entry.
3. Launch the UserForm
Insert a new module (Insert → Module) and create a Sub to display the form:
Sub AddAddress()
    frmAddress.Show
End Sub
Assign this macro to a button on your worksheet (right-click the button → Assign Macro → AddAddress).
Alternative: Auto-open when the file opens:
Add this code to the ThisWorkbook module:
Private Sub Workbook_Open()
    frmAddress.Show
End Sub
The input form will now appear automatically whenever the workbook is opened.
Key Controls in Detail
TextBox – Text Input
The TextBox is the workhorse of every UserForm. Important properties:
- MaxLength—Maximum character count (0 = unlimited)
- MultiLine—Allow multi-line input (True/False)
- PasswordChar—Masking character (e.g.,
*for password fields) - ScrollBars—Scroll bars for multi-line text boxes
Code example: Restrict input to numbers:
Private Sub txtPhone_KeyPress(ByVal KeyAscii As MSForms.ReturnInteger)
    ' Allow only digits, plus sign, spaces, and hyphens
    Select Case KeyAscii
        Case 48 To 57   ' 0-9
        Case 43          ' +
        Case 32          ' Space
        Case 45          ' Hyphen
        Case Else
            KeyAscii = 0 ' Block input
    End Select
End Sub
ComboBox – Dropdown Selection
The ComboBox displays a predefined list. Items are typically populated when the form initializes:
Private Sub UserForm_Initialize()
    With cboTitle
        .Clear
        .AddItem "Mr."
        .AddItem "Ms."
        .AddItem "Dr."
        .ListIndex = 0  ' Pre-select first item
    End With

    With cboDepartment
        .Clear
        .AddItem "Sales"
        .AddItem "Marketing"
        .AddItem "IT"
        .AddItem "HR"
        .AddItem "Finance"
    End With
End Sub
Tip: Set the Style property to fmStyleDropDownList so the user can only choose from the list and cannot type free text.
CheckBox and OptionButton
Both offer selection options, but with one key difference:
- CheckBox: Multiple options can be selected simultaneously (e.g., "Subscribe to newsletter" + "Accept terms")
- OptionButton: Only one option within a group can be selected (e.g., "Mr." or "Ms." or "Dr.")
Grouping with Frame controls: For OptionButtons to work correctly, they must be placed inside a Frame. All OptionButtons within the same Frame form a group—selecting one automatically deselects the others in that group.
Private Sub btnSave_Click()
    Dim title As String
    If optMr.Value = True Then
        title = "Mr."
    ElseIf optMs.Value = True Then
        title = "Ms."
    Else
        title = "Dr."
    End If

    ' Newsletter status (CheckBox)
    Dim wantsNewsletter As Boolean
    wantsNewsletter = chkNewsletter.Value
End Sub
ListBox – Multi-Row Selection
The ListBox is ideal for longer lists where the user needs to pick one or more items.
Key property: MultiSelect
fmMultiSelectSingle—Only one item selectable (default)fmMultiSelectMulti—Click to select/deselect individual itemsfmMultiSelectExtended—Shift+Click and Ctrl+Click like in File Explorer
Private Sub UserForm_Initialize()
    With lstCourses
        .Clear
        .AddItem "Excel Fundamentals"
        .AddItem "VBA for Beginners"
        .AddItem "Advanced VBA"
        .AddItem "Power Query"
        .AddItem "Dashboard Design"
        .MultiSelect = fmMultiSelectMulti
    End With
End Sub

' Read selected items:
Private Sub btnShowSelection_Click()
    Dim i As Long
    Dim selected As String
    For i = 0 To lstCourses.ListCount - 1
        If lstCourses.Selected(i) Then
            selected = selected & lstCourses.List(i) & vbNewLine
        End If
    Next i
    MsgBox "Selected:" & vbNewLine & selected
End Sub
Common UserForm Mistakes
1. Not using UserForm_Initialize
If you don't populate ComboBoxes or ListBoxes in the UserForm_Initialize event, users see empty dropdown lists when the form opens. The Initialize event fires automatically before the form is displayed—it's the perfect place for default values and list items.
2. Unload Me vs. Me.Hide
Both close the UserForm, but with different outcomes:
Unload Me—Removes the form from memory. All input values are lost.Me.Hide—Hides the form but keeps all values intact. The calling code can still read the controls.
Use Me.Hide when the calling code needs to read the entered values:
' In the calling module:
Sub CollectData()
    frmInput.Show vbModal
    ' Form is only hidden now, values still accessible:
    Dim userName As String
    userName = frmInput.txtName.Value
    Unload frmInput  ' Remove from memory only after reading values
End Sub
3. Missing input validation
Without validation, empty cells or invalid data end up in your worksheet. Always check required fields and formats before saving (see the practical example above).
4. Not renaming controls
Default names like CommandButton1, TextBox3, ComboBox2 make code unreadable. Use descriptive names with prefixes from the start: btnSave, txtEmail, cboDepartment. This saves hours of debugging time.
FAQ
Can I create a UserForm without knowing VBA?
You can design the form visually in the editor—that requires no programming. But as soon as the buttons need to do something (save data, validate fields), you need VBA code. The VBA Code Generator can create this code from a plain-text description of what you want.
How do I make a UserForm responsive?
VBA UserForms don't support automatic resizing like web pages. You can adjust control positions and sizes manually in the UserForm_Resize event. For most use cases, setting the form to a sensible fixed size with StartUpPosition = 1 (center of screen) works well enough.
Can I add images to a UserForm?
Yes, using the Image control. Set its Picture property to an image file (BMP, JPG, GIF, ICO). You can also load images via code: imgLogo.Picture = LoadPicture("C:\Path\logo.bmp"). Note that the image gets embedded in the Excel file and increases file size.
What is the difference between modal and modeless UserForms?
A modal UserForm (frmName.Show vbModal or simply .Show) blocks interaction with Excel until the form is closed. A modeless UserForm (frmName.Show vbModeless) lets the user work with the worksheet at the same time. Modal is the default and almost always the right choice for input forms.
How do I save UserForm data to a database?
Instead of writing to a worksheet, you can use an ADO connection to save data to an Access database or SQL Server. Replace the ws.Cells(...) lines in your save code with ADO commands: Connection.Execute "INSERT INTO TableName VALUES(...)". The VBA Assistant can generate the appropriate ADO code for your database.
Build UserForms Automatically
The VBAssistant AI builds complete UserForms from a text description—layout, event handlers, and data transfer included. Just describe what the form should do and get production-ready VBA code.
Try it free—10 requests included, no registration required.
Code Generation
Automatic VBA code creation through natural language
Code Analysis
Understand and document code
Debugging
Intelligent error detection and resolution
Code Improvement
Optimization and error handling
UI Design
Generate UserForms via natural language
Snippet Management
Over 100 ready-made code building blocks
Build UserForms faster
The VBA Assistant creates complete UserForms from a text description—layout, event handlers, and data transfer included.